Monday, January 25, 2010

Love the Topstitch Paper!

I had such a fun day on Saturday at the Unit Meeting for CTMH consultants.  We did a lot of great papercrafting and sharing information with each other.  Thanks to all the Consultants that came and shared their talents with everyone!  I had a blast!

Here are some items that we made using the very cute new Topstitch paper pack from our Spring 2010 catalog.

This is a Journal cover for our new Journals that Treena Patzke taught us how to make:


This next item is a Tag booklet taught by Karen Gerlach.  I can't wait to put some pictures of my kids in it.


Here it is opened up:


Here is the bookmark that I taught.  It can stand on a table or slide in a book:


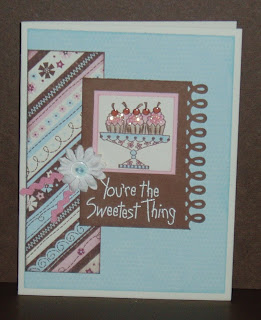
And here is the card that I made for the February Stamp of the Month Swap - It's a little sneek peek of the adorable "Piece of Cake" stamp set we will be offering next month:


This is just a small sample of the many items that we made on Saturday.  Stay tuned and I will post more of the fantastic artwork we had so much fun creating!  Thanks again to Julie and all the Consultants that were there!

Monday, January 18, 2010

Stamp Club Card

That's right at the last minute (day before my stamp club) I decided to change the card that we will be making for our club nights.  I do this from time to time, but I'm much happier with the new card and from the comments from the ladies at club they liked it too!

The front has a hole cut through so you can see part of the picture inside the card.  Of couse, I couldn't throw away the circle that was left over after cutting out, so I made a tag too.


Here is the inside of the card showing the other birdy and the rest of the sentiment.  So cute!

Here are the instructions to make this adorable card:

Featured Products:

• Veranda Creative Basics

• Inks: Garden Green, Juniper, Crème Brulee, Tulip

• D1406 True Friends stamp set

• C1396 Love Birds stamp set

• A1103 A Love stamp set

• Z1269 Filigree Charms


Supplies:

5 ½ x 4 ¼ Colonial White Card Base

4 x 5 ¼ Juniper CS

1 ¾ x 3 ¾ B&T Floral

1 ½ x 3 ¾ B&T Stripe (2)

3 x 2 Colonial White CS to stamp image for card front

1 ½ x 1 ½ Colonial White CS for heart image on tag

2 ½ x 2 ½ Garden Green CS punched with scallop circle

3-d Foam Tape

Sponge for inking edges

Ribbon for tag

Coluzzle circle, Knife and Mat


Directions:

1. Ink edges of all three pieces of B&T paper and Garden Green scallop circle using Juniper ink and sponge.

2. Glue the two striped pieces of B&T paper to the Juniper cardstock leaving an even edge on the sides. Glue the Floral B&T to the Juniper cardstock centering between the two striped pieces.

3. Glue Juniper CS to the front of the Colonial White card base.

4. Open card base and place on cutting mat. Using the 3rd smallest circle on the Coluzzle template, cut a hole through all layers of the front of the card. See picture for placement.

5. Save cut out, ink the edges using Juniper ink and glue to center of scallop circle for tag.

6. Lightly outline the hole using a pencil.

7. Open card and stamp the bird image using Juniper ink – placement should be at the bottom edge of circle. Place “mask” over the bird and stamp the Cage image using Garden Green ink. Remove mask.

8. Stamp the other bird image using Juniper ink and the three hearts using Tulip ink.

9. Stamp “you” using Juniper ink. Stamp the bracket using Garden Green ink and then rolling in Juniper ink.

10. Stamp the frame using Garden Green ink and then rolling in Juniper ink onto Colonial white CS. Stamp the heart using Garden Green ink and then rolling in Juniper ink onto small piece of Colonial white CS.

11. Stamp the words “Somebirdy Loves” centering in the frame using Juniper ink.

12. Cut out frame and heart images.

13. Use 3-d foam tape to mount frame to front of card. Use 3-d foam tape to mount heart to front of tag.

14. Stamp the squiggle line above the cage on card front using Juniper ink. Use a glue dot to adhere the Filigree charm to card front.

15. Punch a hole in tag and add ribbon for loop. Stamp with love on back of tag using Juniper ink.

Monday, January 11, 2010

Stamp Club Project - January SOM


This is the card we will be making this month at our Stamp Clubs.  It uses the Veranda Creative Basics paper pack including the ribbon.  The January Stamp of the Month "True Friends", The cute little bird is from the National Papercrafting Felicity Kit.  I also used the new Filigree Charms for the metal accent and a paper flower cut in half.  Colors used are Twilight Blue, Garden Green and Creme Brulee is the yellow.  Thank you goes out to another consultant (will need to look up her name)  for her card that I lovingly cased.  Love this paper pack!

Valentine Card - Truly, Madly, Deeply


I made this card using this past weeks Split Coast Stampers sketch Challenge # 262.
I used CTMH Notebook paper and added a little Silhouette black stripe paper.  Colors are Hollyhock, black and Bamboo.
Stampsets used:  January's Stamp of the Month "True Friends" for the frame and bracket, "A Love" set for the heart, " Priceless Word Puzzle" for the words Truly Madly Deeply and "Solo X" for XOXO.

Monday, January 4, 2010

Surprise! Lollipop Party Favor

This is the party favor that I made for my friend's surprise birthday party this weekend.  I used the new Noted Backgrounds stamp set from CTMH.  She loves Houndstooth so this was perfect for her.  I also used the Be Yourself stamp set for the Girls and for the Frame and Happy Birthday I used a set called Annotations.


These are really very easy to make.  I started out with punching out two scalloped circles for the top.  One in Black Cardstock and the other in White.  I stamped the houndstooth image on the white scallop circle using black ink.  Then I stamped the little frame and Happy Birthday on a piece of white cardstock, cut it out and used 3-d foam squares to pop it up.

For the base I started with a 2" x 7 1/2" piece of white cardstock and scored it at 2 1/2", 4", and 7". (You'll want to check the size of your lollipops and adjust if needed.  I used Tootsie Pop's for mine)
I folded on the score lines, punched a hole in the center of the last score line and stamped the girls using black ink on the front and back.

Oh, I made little wrappers for the Tootsie pop lollipops because they didn't match the black and white theme I was going for.  I just stamped the houndstooth design on some white computer paper and wrapped them right over the tootsie pop wrapper.

Stick the lollipop in upside down and poke the stick through the hole.  I used a little double-sided tape to keep them centered.   Then I used double-sided tape to adhere the 1/2" flap down.  I used my Martha Stewart Loop punch to make a 2" x 1" loop border to cover up the flap, glued that on using double-sided tape.

Used glue dots to adhere the houndstooth scallop circle to one side of the stick and another glue dot to adhere the black scallop circle to the back of the stick.  Then I added the piece of houndstooth ribbon to the stick tying in a knot.

Done!  They are very easy to do and would be so cute done for Valentine's Day too.


Friday, January 1, 2010

Happy New Years! Celebrate with National Papercrafting Month...


Celebrate Papercrafting with the stunning Felicity Collection!  The collection features decorative die-cut paper, three gorgeous color schemes, and a D-size stamp set that include flowers, flourishes, argyle patterns, birds and an entire alphabet!  Your papercrafting possiblilities are endless!

Find out how you can get this collection: